
Quick Answer
Winterizing your lawn sprinkler system involves draining all water from pipes, valves, and sprinkler heads to prevent freeze damage. This process typically includes shutting off the water supply, draining the system using compressed air or manual methods, and insulating exposed components[1].
Key Takeaways
- Winterize before the first hard freeze (typically when temperatures drop below 28°F)
- Three main methods: compressed air blowout, manual drain, or automatic drain
- Shut off water supply and controller before starting the process
- Insulate backflow preventers and above-ground components
- Consider professional service for complex systems or if you lack proper equipment
Why Winterizing Your Sprinkler System Matters
Freezing water expands by approximately 9%, creating tremendous pressure that can crack pipes, damage valves, and destroy sprinkler heads[2]. Even small amounts of trapped water can cause expensive repairs come spring. Most irrigation system damage occurs when homeowners skip winterization or perform it incorrectly[3].
The investment in proper winterization—whether DIY or professional—typically costs far less than repairing freeze damage, which can run into hundreds or thousands of dollars depending on your system's complexity. While you're winterizing your irrigation, don't forget to also winterize your lawn mower and prepare your lawn for winter.
Step-by-Step Winterization Process
Method 1: Compressed Air Blowout (Most Effective)
This method requires an air compressor capable of producing 20-80 CFM depending on your system size[4].
- Turn off the water supply at the main shutoff valve
- Set controller to "rain" or "off" mode to prevent accidental activation
- Connect air compressor to the system's drain valve or test cock
- Activate each zone manually while applying compressed air (30-50 PSI for spray heads, 30 PSI for drip systems)
- Blow out each zone until only air comes from sprinkler heads (typically 2-5 minutes per zone)
- Disconnect air compressor and close all valves
Method 2: Manual Drain Method
If your system has manual drain valves at low points:
- Shut off water supply and controller
- Open all manual drain valves located at system low points
- Activate each sprinkler zone to help gravity drain remaining water
- Leave drain valves open throughout winter
Method 3: Automatic Drain System
Some newer systems include automatic drain valves that open when water pressure drops[5]:
- Turn off water supply
- Run each zone briefly to relieve pressure and activate automatic drains
- Verify all zones have drained by checking that sprinkler heads are empty
Protecting Above-Ground Components
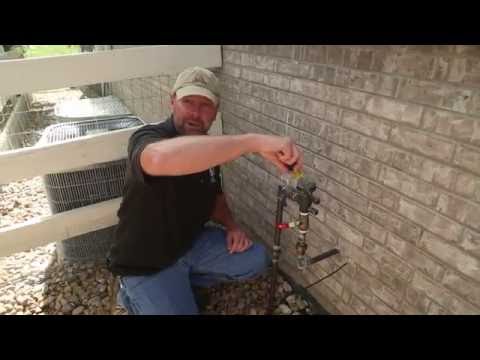
Backflow Preventer Care
Backflow preventers are particularly vulnerable since they're typically above ground[1]. After draining your system:
- Remove test cocks and relief valves if possible
- Wrap the unit in insulation or specialized covers
- Store removable parts indoors in a labeled bag
- Never use plastic bags directly against metal components (condensation risk)
Controller and Valve Box Winterization
- Switch controller to "off" or "rain" mode
- Install a rain sensor if you don't have one (prevents accidental activation during winter thaws)
- Ensure valve boxes have adequate drainage
- Check that valve box lids fit securely[6]
Timing and Regional Considerations
Winterization timing varies significantly by geographic location. In northern climates, complete winterization before nighttime temperatures consistently drop below 32°F[2]. Southern regions may only need partial winterization or protection of sensitive components.
Optimal timing by USDA zone:
| Zone | Region (examples) | First hard freeze (typical) | Winterize by |
|---|---|---|---|
| 3 | Northern Minnesota, North Dakota | Late September | Mid-September |
| 4 | Wisconsin, Iowa, Vermont | Early October | Late September |
| 5 | Chicago, Denver, Boston | Mid-October | Early October |
| 6 | Philadelphia, Kansas City, Portland (OR) | Late October | Mid-October |
| 7 | DC, Nashville, Seattle, Portland (ME-warming) | Early to mid-November | Late October |
| 8 | Atlanta, Dallas, Charlotte | Mid-November to early December | Mid-November (backflow + above-ground) |
| 9 | Houston, Phoenix, Jacksonville | Late December or no hard freeze | Wrap backflow only; full winterization optional |
| 10+ | South Florida, coastal SoCal | Hard freeze rare | Skip; protect backflow on cold snaps |
Monitor extended weather forecasts rather than calendar dates, as unseasonable temperature drops can catch homeowners unprepared[3]. A two-week cushion is normal — winterize well before the first forecast freeze, not after the second one.
Tool and Materials Checklist
If you're going the DIY compressed-air route, here's the full kit and approximate price range. The total is usually $150–$300 to outfit yourself for a multi-year cycle.
| Item | Why you need it | Typical price | Notes |
|---|---|---|---|
| 20+ CFM air compressor | Volume is the spec that matters, not just PSI | $300–$800 (or rent for $50–$100/day) | Pancake compressors are too small — they push air across the top of pipes, leaving water at the bottom |
| Backflow blowout adapter / quick-connect fitting | Connects compressor hose to the irrigation system without damaging fittings | $15–$35 | Match the thread size to your blowout port |
| Pressure regulator | Caps output PSI to a safe range for irrigation parts | $25–$50 | Set to 50 PSI for spray heads, 30 PSI for drip |
| Insulated backflow preventer cover | Protects the above-ground device after blowout | $20–$45 | Look for a model rated for your hardware size |
| 4-mil heavy plastic + duct tape | Backup insulation for valves and exposed fittings | $10 | Use as a cap, not directly against metal in humid conditions |
| Permanent marker / freezer-grade labels | Mark the irrigation main shutoff for next year | $5 | One spring trip to the basement avoided is worth it |
| Soil thermometer | Confirms when soil is approaching freeze | $10–$15 | Track at 4 inches; sustained below 40°F means act now |
Renting a tow-behind 80+ CFM compressor often costs more than a one-time professional winterization once you add the deposit and round-trip transport. If you only have one system, paying the pro is usually the cheaper math — see the cost comparison below.
Common Failure Modes (What Actually Breaks)
When winterization is skipped or done wrong, damage shows up in predictable places. Knowing the failure modes also helps you spot trouble during spring startup.
- Cracked backflow preventer body. The most expensive and most common failure. A cracked Wilkins 375 or Febco 765 typically costs $200–$450 in parts and labor to replace. Symptom: water gushing from the unit on first spring pressurization, or visible hairline cracks in the brass.
- Split poly tubing at lateral lines. Cheaper to fix but harder to find. Symptom: a soggy patch in the lawn that won't dry out once the system runs.
- Broken valve manifold solenoids. Frozen water inside the valve body cracks the diaphragm housing. Symptom: a zone that won't shut off, or a zone that won't turn on.
- Sheared sprinkler risers. Trapped water inside the swing-pipe nipple shatters under freeze pressure. Symptom: a head that geysers or fails to pop up.
- Damaged drip emitters. Less catastrophic but tedious. Symptom: plants near the affected line don't get watered evenly the following spring.
For lawns in zones 6 and colder, also walk through our preparing your lawn for winter checklist — sprinkler winterization is one item among several, and missing the rest leaves you behind in spring.
DIY Cost vs. Professional Service
The break-even decision usually comes down to how many seasons you'll do this yourself and whether you already own a compressor that meets the 20+ CFM spec.
| Option | Year 1 cost | Year 2–5 (per year) | 5-year total |
|---|---|---|---|
| DIY (own a 20+ CFM compressor already) | ~$40 (adapter + cover) | ~$0 | ~$40 |
| DIY (rent compressor each year) | ~$80 | ~$60 | ~$320 |
| DIY (buy 20+ CFM compressor) | ~$450 | ~$0 | ~$450 |
| Professional service | $75–$150 | $75–$150 | ~$375–$750 |
Pros take about 15–20 minutes per system and typically guarantee against freeze damage they cause. If you already own a beefy compressor for shop work, DIY is unbeatable. If you don't, the math favors the pro for most homeowners with a single residential system.
When to Call a Professional
Consider professional winterization if:
- Your system lacks proper drain valves
- You don't own a sprinkler winterization kit or adequate air compressor
- The system includes complex zones with different pressure requirements
- You're uncomfortable working with compressed air equipment
- Previous DIY attempts resulted in incomplete drainage
Professional services typically cost $75-150 but include equipment, expertise, and often a service guarantee[4].
Preparing for Spring Startup
Before ending your winterization:
- Document any issues discovered during the process
- Note which sprinkler heads need adjustment or replacement
- Store removal parts (like backflow test cocks) in clearly labeled containers
- Schedule spring startup inspection to check for winter damage[5]
- Review our spring lawn watering schedule so your system is dialed in from day one
Spring Startup Checklist
The reverse process matters as much as the winterization itself — a sloppy spring startup can re-introduce damage that the winter avoided.
- Wait for soil temps above 40°F at 4 inches. Pressurizing while pipes are still at freezing temperature risks expansion cracks.
- Close the manual drain valves before opening the main shutoff.
- Open the main shutoff slowly — a half-turn at first, then fully open after 30 seconds. A sudden surge can blow apart a glued joint that survived winter.
- Walk each zone with the controller while the system runs, looking for geysers, low-output heads, and soggy patches.
- Reset the controller to your spring program before you forget. Pair this with a spring lawn watering schedule tuned to your soil type.
- Replace the backflow preventer cover by mid-April — and store it indoors over summer so it doesn't get UV-brittle.
If anything looks off, fix it before you run a full irrigation cycle. A small leak unattended for a week wastes hundreds of gallons and erodes the soil around the line, making the real fix harder.
For other warm-season prep items that overlap with sprinkler startup (mowing, fertilization, weed control), the seasonal care topic hub is the home base.
Conclusion
Proper sprinkler system winterization protects your irrigation investment and ensures reliable performance next growing season. Whether you choose compressed air blowout, manual draining, or professional service, the key is completing winterization before sustained freezing weather arrives. Start planning your winterization strategy now, gather necessary equipment or service contacts, and monitor weather forecasts for optimal timing. Your lawn and your wallet will thank you come spring.
Sources
- Colorado State University Extension — Irrigation system winterization and freeze protection guidelines
- University of Nebraska-Lincoln Extension — Turfgrass irrigation management and seasonal maintenance
- Rain Bird Corporation — Professional irrigation system maintenance and winterization research
- Irrigation Association — Industry standards for irrigation system maintenance and winterization
- Michigan State University Extension — Landscape irrigation system management and freeze protection
- Consumer Reports — Home irrigation system maintenance and cost analysis